Create a PostgreSQL Database#
Alright, let’s get a database set up and ready to use.
Assignment#
PatientPing’s data needs a proper home. Everyone is in constant fear that the next time Zach reboots things, we’re going to lose data.
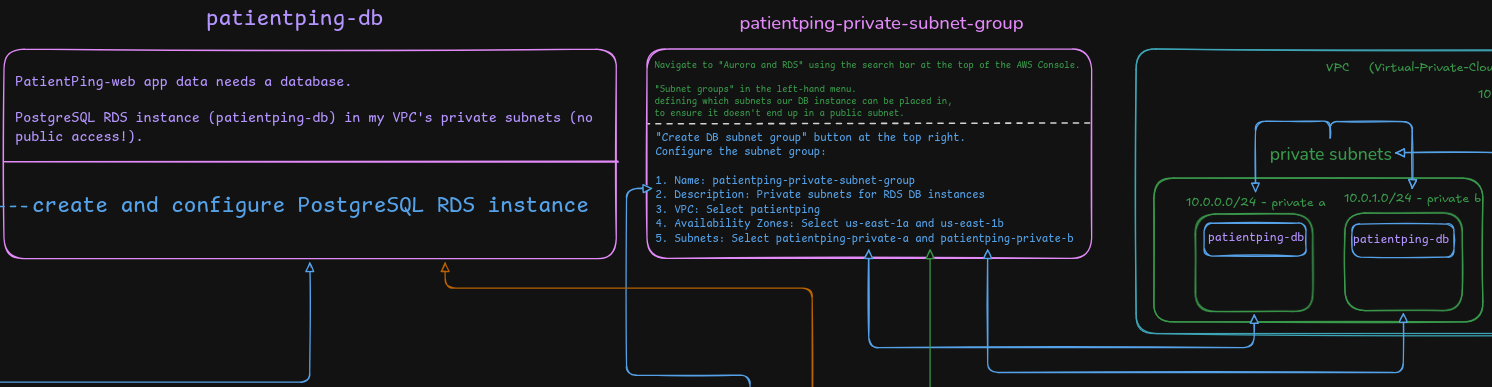
Create a PostgreSQL RDS instance (patientping-db) in your patientping VPC’s private subnets (no public access!).
Cost check: A db.t3.micro instance costs about $0.018 per hour (~$13/month). Be sure to delete this when you’re done. AWS only allows you to “pause” an RDS instance for a time, then it starts it up again.
- Navigate to “Aurora and RDS” using the search bar at the top of the AWS Console.
- Click “Subnet groups” in the left-hand menu. We’re going to start by defining which subnets our DB instance can be placed in, to ensure it doesn’t end up in a public subnet.
- Click the orange “Create DB subnet group” button at the top right.
- Configure the subnet group:
- Name:
patientping-private-subnet-group - Description:
Private subnets for RDS DB instances - VPC: Select
patientping - Availability Zones: Select
us-east-1aandus-east-1b - Subnets: Select
patientping-private-aandpatientping-private-b
- Name:
- Click “Create”; it should complete immediately.
- Still in the “Aurora and RDS” area, click “Databases” in the left-hand menu.
- Click the orange “Create database” button at the top right.
- You’ll be greeted with a large number of options. Start by selecting “Full configuration” (not “Express configuration”).
- Choose PostgreSQL as the engine.
- Under “Engine version,” select the latest available version of
PostgreSQL 17. - Under “Templates,” select “Free Tier” if available, otherwise “Sandbox” or “Dev/Test.” Regardless, make sure “Availability and durability” is set to “Single-AZ” with 1 instance (to keep things simple and minimize cost).
- Configure database settings:
DB instance identifier:
patientping-dbMaster username:
postgres(default)Credentials management: “Self managed” (default)
Master password: Create a strong password using only alphanumeric characters (to avoid encoding issues), and save it
Make sure you save your database password securely! You won’t be able to connect to the DB from your application server without it.
Database authentication options: “Password authentication” (default)
Configure instance:
- Instance type:
db.t3.micro - Storage: Leave default (
20 GiB,gp2) - Storage autoscaling: Disable
AWS Free Tier issue: If the instance type dropdown is disabled, or all the instance types are greyed out, you’ll need to create a database using the AWS CLI instead.
Go directly to the Tips section below and use the provided CLI commands.
- Instance type:
Configure connectivity:
- Select “Don’t connect to an EC2 compute resource” (we’ll do that later)
- VPC: Select
patientping - DB subnet group: Select
patientping-private-subnet-group - Public access:
No(critical: database should not be publicly accessible!) - VPC security group: Select “Create new,” and name it
patientping-rds-sg
Availability Zone:
us-east-1aConfigure monitoring:
- Select “Database Insights – Standard” (rather than “Advanced”)
- Disable “Performance Insights” and everything else in this section
Set “Additional configuration”:
- Initial database name:
patientping - DB parameter group: Leave default
- Backup: Leave “Enable automated backup” enabled
- Backup retention period:
1 day - Encryption: Enable if possible
- Maintenance: Leave default
- Initial database name:
Finally, click the orange “Create database” button at the bottom.
Wait for the database to come online; this can take 5–10 minutes.
Once the database status shows Available
Tips#
If you want (or need) to use the AWS CLI instead of the web console, you can use the following commands.
- Check if you already created
patientping-private-subnet-group:
aws rds describe-db-subnet-groups \
--db-subnet-group-name patientping-private-subnet-group- If you need to create the subnet group, get the subnet IDs of
patientping-private-aandpatientping-private-b:
aws ec2 describe-subnets \
  --filters Name=tag:Name,Values=patientping-private-a --query 'Subnets[0].SubnetId'
aws ec2 describe-subnets \
--filters Name=tag:Name,Values=patientping-private-b --query 'Subnets[0].SubnetId'- Create the RDS subnet group:
aws rds create-db-subnet-group \
  --db-subnet-group-name patientping-private-subnet-group \
  --db-subnet-group-description 'Private subnets for RDS DB instances' \
--subnet-ids PRIVATE_A_ID PRIVATE_B_ID- Before creating the database itself, make a security group for it. You’ll need your VPC ID:
aws ec2 describe-vpcs \
--filters 'Name=tag:Name,Values=patientping' --query 'Vpcs[0].VpcId'- Create the security group, and note its
GroupId:
aws ec2 create-security-group \
  --group-name patientping-rds-sg \
  --description 'Security group for PatientPing RDS' \
--vpc-id VPC_ID- Create the actual database instance:
aws rds create-db-instance \
  --db-instance-identifier patientping-db \
  --db-instance-class db.t3.micro \
  --engine postgres \
  --master-username postgres \
  --master-user-password YOUR_ALPHANUMERIC_PASSWORD \
  --allocated-storage 20 \
  --storage-type gp2 \
  --db-name patientping \
  --db-subnet-group-name patientping-private-subnet-group \
  --vpc-security-group-ids SECURITY_GROUP_ID \
  --availability-zone us-east-1a \
  --no-publicly-accessible \
  --no-multi-az \
  --backup-retention-period 1 \
  --no-enable-performance-insights \
--no-deletion-protection- Wait until the database becomes
Available(allow 5–10 minutes for this command to return):
aws rds wait db-instance-available --db-instance-identifier patientping-db