Internet Gateways (IGW)#
The eagle-eyed among you may have noticed that there is currently no difference between our “public” and “private” subnets.
Anything we put in either type of subnet cannot access the internet, and nothing on the internet can access it. Our environment looks like this:

There is a gap between our network and the internet. Usually when folks refer to a subnet as public, they mean the servers inside can access the internet (egress), and with limitations, the internet can access them (ingress).
Our PatientPing public subnets need:
- An Internet Gateway (IGW) that can connect them to the internet
- A route that tells servers in these subnets to use that IGW
The route tells outgoing traffic, “Hey, this gateway exists; if you’re trying to reach a server that’s not in our network, look here.”
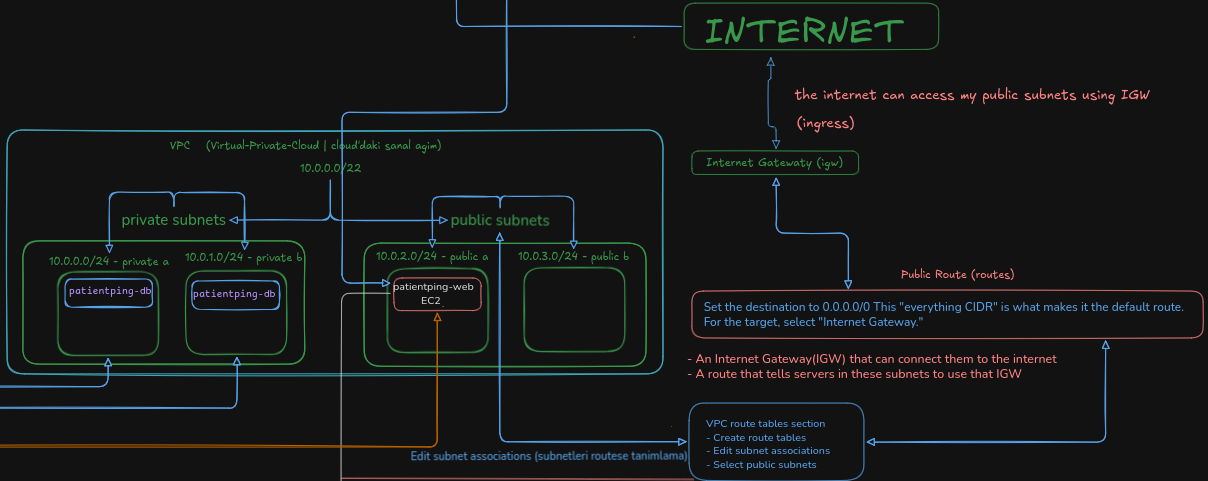
how to crate IGW to vpc(sanal ag)#
PatientPing servers need access to the internet. Start by attaching an IGW to our VPC.
Cost check: Internet gateways are free. You only pay for data transfer.
- Navigate to “VPC” using the search bar in the AWS Console.
- Click on “Internet gateways” in the left-hand menu.
- Click the orange “Create internet gateway” button at the top right.
- Name the new gateway
patientping-igw, then click “Create internet gateway.” - Go back to the list of gateways and select
patientping-igwby clicking on its checkbox. - Click the “Actions” dropdown button at the top right, then click “Attach to VPC.”
- Select the
patientpingVPC and click “Attach internet gateway.”
We don’t have a route yet (we’ll take care of that next), but we’re one step closer.
Tip#
If you want to use the CLI instead, here’s the command structure:
# Create an internet gateway
aws ec2 create-internet-gateway --tag-specifications 'ResourceType=internet-gateway,Tags=[{Key=Name,Value=<name>}]'
# Attach the IGW to a VPC
aws ec2 attach-internet-gateway --internet-gateway-id <igw-id> --vpc-id <vpc-id>