IAM Roles#
Okay, so we can give our users (e.g. developers) access to AWS resources… but what happens when we need our application server to be able to access a resource? For example, an EC2 instance that needs to read from an S3 bucket?
We could create a user for our server, but by using a username and password, but we’ll eventually encounter this dreadful message:
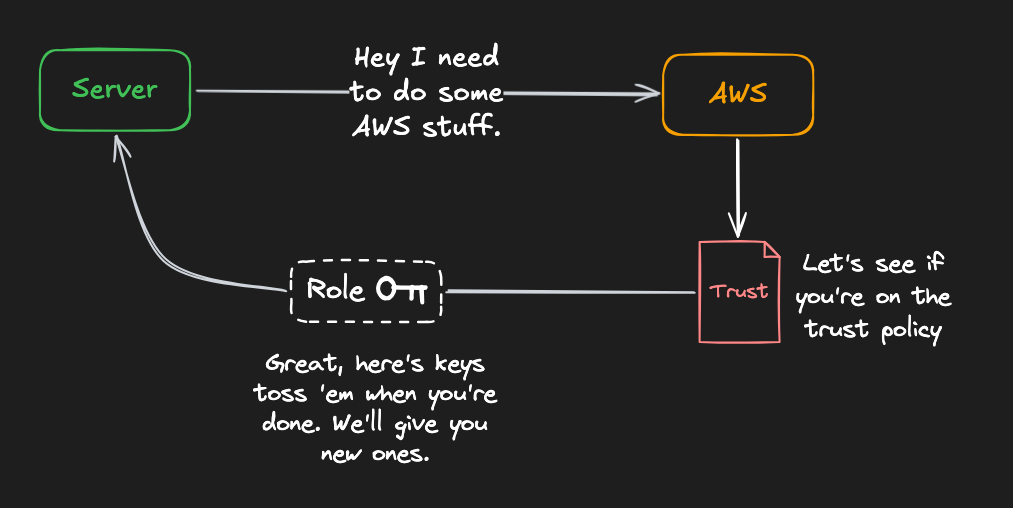
Luckily, IAM has roles. A role is a temporary identity that can be used or assumed by trusted parties.
The process is simple:
- Create a role with a policy that defines what actions it can perform.
- Assign the role to a trusted entity, like an EC2 instance.
- The entity can then assume the role to get temporary credentials.
- The credentials are automatically rotated and expire after a short time, so there’s no need to manage them manually.
A trust policy looks a lot like a “regular” policy, with a couple of tweaks:
{
  "Version": "2012-10-17",
  "Statement": [
    {
      "Effect": "Allow",
      "Principal": {
        "Service": "ec2.amazonaws.com"
      },
      "Action": "sts:AssumeRole"
    }
  ]
}- The
Principalfield specifies which service or entity can assume the role. - The
sts:AssumeRoleaction allows the specified principal to assume the role.
When you select “EC2” as the use case, AWS automatically creates this trust policy for you. The trust policy tells AWS which services can assume this role (in this case, EC2 instances). You can view it later in the role’s “Trust relationships” tab.
Assignment#
Create an IAM role patientping-ec2-readonly-role for EC2 with the patientping-ec2-readonly policy, then attach the role to your EC2 instance.
Cost check: Creating IAM roles is free; costs arise from service usage.
- Create the IAM role:
- Navigate to “IAM” → “Roles” in the AWS Console.
- Click “Create role.”
- Choose
AWS serviceunder “Trusted entity type,” thenEC2under “Use case.” Click “Next.” - Select the
patientping-ec2-readonlypolicy to attach it, then click “Next.” - Set the role name to
patientping-ec2-readonly-role. Leave everything else here as-is, and click “Create role” at the bottom.
- Attach the role to an EC2 instance:
- Navigate to “EC2” → “Instances” in the AWS Console.
- Select your
patientping-web-v2EC2 instance. - With your instance selected, click the “Actions” dropdown → “Security” → “Modify IAM role.”
- Select
patientping-ec2-readonly-roleand click “Update IAM role.”
You should now see the IAM role listed in the instance details.
Tip#
Here’s some CLI boilerplate to get you started with IAM roles:
# Create a role with trust policy
aws iam create-role --role-name ROLE-NAME --assume-role-policy-document file://TRUST-POLICY.json

# Attach a policy to the role
aws iam attach-role-policy --role-name ROLE-NAME --policy-arn POLICY-ARN

# Create an instance profile and add the role
aws iam create-instance-profile --instance-profile-name PROFILE-NAME
aws iam add-role-to-instance-profile --instance-profile-name PROFILE-NAME --role-name ROLE-NAME

# Associate the instance profile with an EC2 instance
aws ec2 associate-iam-instance-profile --instance-id INSTANCE-ID --iam-instance-profile Name=PROFILE-NAME