Security Groups#
Wait, so anyone who knows my server’s public IP address can access it?!
On some level, yes. That’s why we need a layer of protection to inspect network traffic coming in and going out, and make sure it’s traffic we actually want. We need a firewall, or in AWS terms, a security group. It lets you set rules like:
- All traffic coming from my server is allowed to go where it wants (i.e., outbound traffic).
- Folks on the internet are allowed to reach my web server, but not my database server (i.e., inbound traffic).
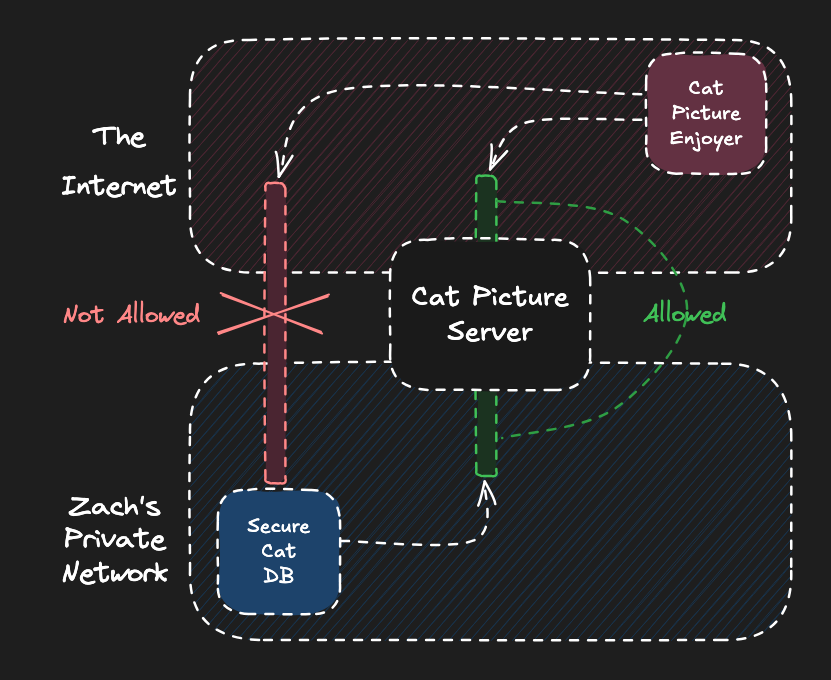
If you want to access your new EC2 instance from your laptop, you’ll need to make sure that traffic is allowed.
Your computer’s public IP address is controlled by whoever is providing internet service. You can visit this site to see what your IP is right now, but if you go to a coffee shop or turn on a VPN, your address will change.
how to create security gruop and attacht o instance (aslinda burada network kind of firewall ayarlari)#
Create a security group that allows SSH access (TCP port 22) to the patientping-web server. We need to get on the box before we can do anything useful with it. We’ll open up web traffic later.
Cost check: Security groups are free. You only pay for the resources that use them.
- Navigate to “EC2” using the search bar in the AWS Console.
- Click “Security Groups” in the left-hand menu under “Network & Security.”
- Click the orange “Create security group” button at the top right.
- Configure the security group:
- Name:
patientping-public - Description:
Allow public access - VPC: select
patientping
- Name:
- Add an inbound rule (click “Add rule”):
- Type:
SSH; Source:My IP(it’ll auto-detect); Description:Allow SSH from my computer
- Type:
- Leave outbound rules as default (allows all outbound traffic).
- Click “Create security group.”
- Attach the security group to your EC2 instance:
- Navigate to “EC2” → “Instances.”
- Select the
patientping-webinstance. - Click “Actions” → “Security” → “Change security groups.”
- Under “Associated security groups,” click on the search field, select the new
patientping-publicSG, and click “Add security group.” - Click “Save.”
Tip#
If you want to use the CLI instead, here’s the command structure:
# Create a security group
aws ec2 create-security-group --group-name NAME --description DESCRIPTION --vpc-id VPC-ID

# Add an inbound rule
aws ec2 authorize-security-group-ingress --group-id SG-ID --ip-permissions IpProtocol=tcp,FromPort=22,ToPort=22,IpRanges=[{CidrIp=YOUR-IP/32,Description=DESCRIPTION}]

# Attach to an instance
aws ec2 modify-instance-attribute --instance-id INSTANCE-ID --groups SG-ID